[Python Machine Learning] 10. DBN
1. 인공 신경망
심층 신뢰망을 설명하기에 앞서 가장 기본적으로 알고있어야 할 인공신경망부터 살펴보자. 인공신경망은 사람의 뇌가 어떻게 복잡한 문제를 푸는지에 대한 가설을 기반으로 만들어진 알고리즘이다. 입력 피쳐 세트에 대해 함수를 생성하고 최적화하기 위한 학습을 수행하는 수학적 모델이며, 신경망 구축을 통해 하고자 하는 최종 결과는 성능 측정 기준을 이용하는 연산 함수를 통해 정의 되며, 입력 데이터에 대해 분류, 예측, 변환 작업을 수행한다.
이번 절에서는 구성요소와 네트워크 토폴리지만 확인할 예정이며, 더 자세한 내용은 인공신경망 챕터를 참고하기 바란다.
1) 구성요소
- 학습 프로세스
노드의 가중치 함수에 대한 파라미터를 조정하는 방식으로 학습을 수행한다.
학습함수는 비용함수를 최소화하기 위해 특정 가중치에 대한 조정 값을 결과로 만들어낸다. - 뉴런 세트, 가중치 세트
노드 각각은 입력 데이터에 대한 변화를 일으키는 활성화 함수(=가중치 함수)를 지니고 있다.
활성화 함수는 네트워크 간에 매우 여러가지 형태로 나타날 수 있다.
가중치에 대해서는 변동성이 있어야 한다. 즉, 학습 프로세스 과정에서 최신 값으로 업데이트하는 데 따라 바뀔 수 있어야 한다. - 연결함수
임의의 노드에서 다른 노드로 데이터를 넘길 수 있게 제어한다. 노드는 제약의 유무에 관계없이 상호 간에 입력값을 자유롭게 넘길 수 있다. 또한 입력 데이터가 특정 방향으로 가게끔하여 여러 레이어가 좀 더 구조화된 형태를 띄게 할 수 있다.
2) 네트워크 토폴리지
신경망의 뉴런은 매우 다양한 형태로 서로 연결되어 있으며, 구조에 따라 네트워크의 학습 능력이 좌우되는 매우 중요한 요소이다. 이전 장에서 살펴본 SOM의 경우 각 노드에 속한 가중치 백터에 각각의 입력 케이스를 프로젝션시키며. 이 후 데이터셋의 적절한 매핑이 이뤄질 때 까지 노드를 재정렬하는 과정을 가진다.
구조는 사각형 혹은 육각형 크리드구조로 나타난다.
지도학습에서 가장 보편적인 토폴로지는 3-레이어 피드포워드 네트워크로, 대표 사례로는 다층 신경망이 있다.
네트워크 토폴로지 모델에서 네트워크 내의 뉴런은 레이어로 분리돼 있고 각 레이어는 해당 레이어 너머에 있는 다른 레이어와 통신하는 구조를 갖고, 첫 레이어는 히든 레이어로 넘기기 위한 입력 값을 갖는다. 히든 레이어는 가중치 활성화를 이용해 게이터를 어떻게 표현할 지 만들고, 활성화 값을 출력 레이어로 전달한다. 출력 레이어는 일반적으로 네트워크의 결과를 반환한다.
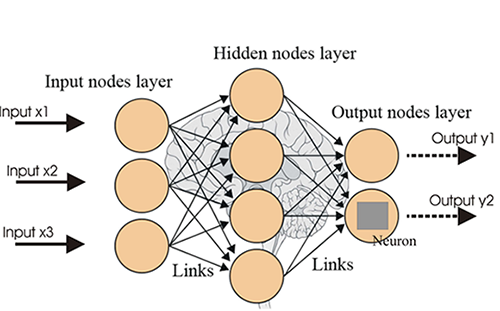
어떤 네트워크 토폴로지가 적절한 지는 해당 문제와 원하는 결과에 따라 매우 다양하다. 이유는 각 토폴로지마다 특정 영역에서 강점을 갖는 특징이 있기 때문이며, 이로 인해 특정 학습 프로세스와 토폴로지는 어느 정도 상호 호환성이 있어야 여러 종류의 학습 프로세스를 나타낸다.
학습 프로세스의 궁극적인 목적은 입력 데이터를 점진적으로 정확하게 표현하는 형태이며,네트워크의 가중치를 반복작업을 통해 조정해 나갈 수 있도록 하는 것이다.
위의 과정은 결과적으로 정확도를 높여 입력 데이터에 대해 함수를 근사화 시키는 것으로 이어진다.
2. 제한된 볼츠만 머신(RBM, Restricted Boltzmann Machine)
심층 신뢰망의 기본이 되는 모델로 스토캐스틱 순환 신경망(Stocastic RNN)의 한 종류이다. 에너지 기반 모델 중 하나로 네트워크의 설정 값과 에너지 값을 연관 지을 수 있도록 에너지 함수를 사용한다. 또한 방향성 사이클 그래프의 한 형태이며, 모든 노드는 자신을 제외한 다른 모든 노드와 연결되어있으며, 위와 같은 속성으로 순환적인 특징을 지니게 되고, 결과적으로 모델에 대한 결과는 계속 진화하고, 확인도 지속적으로 할 수 있다.
RBM의 학습 목표는 학습 데이터셋 X의 확률을 극대화 하는 것으로, 에너지를 사용하여 성능을 측정한다.
여기서 에너지란, 모델 파라미터 벡터 Θ 가 주어졌을 때 데이터 셋 X에 대한 확률 값에 마이너스 로그를 취한 값을 의미하며, 주로 차원감소, 분류, 협업필터링, 선형회귀분석, 특징 학습(Feature Learning) 및 주제 모델링 등에서 사용할 수 있는 알고리즘이다. 하지만, 노드의 개수가 증가할 수록 컴퓨팅 시간이 기하급수적으로 증가하여 결국 네트워크의 잔여 에너지를 계산할 수 없는 상태가 된다.
1) 토폴로지
구성은 입력층 1개, 은닉층 1개로 구성되어있으며 심층신경망이라고는 볼 수 없지만, 심층신뢰망(DBN, Deep Belief Network)의 구성요소로 사용된다. 퍼셉트론은 결정적 모델인데 반해, 볼츠만 머신은 확률 모델이며, 다수의 출력뉴런을 갖고 있어 출력이 지도학습의 신호를 받지 않는다. 통계에서는 은닉변수 모델로도 알려져 있으며, 마코프 랜덤 필드와 같은 계열이다. 효율성을 높이기 위해 기존 신경망의 토폴로지와 달리 노드간의 연결에 제약이 추가되어 있고, 각 뉴런은 퍼셉트론과 동일하게 입력의 가중치합을 계산해, 시그모이드 함수를 통해서 변환한다.
이 때 나오는 값은 확률값으로 해석된다.(지도 학습이 아니기 때문에 목표 출력값이 주어지지 않음→ 에러에 대해서 정의하기 어렵다!)
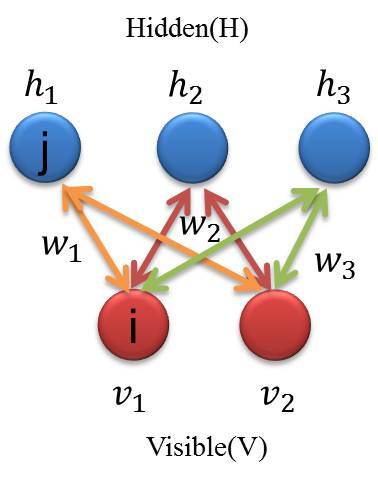
위와 같은 형태의 토폴로지는 히든 레이어와 가시성 레이어가 서로 조건부 독립이라는 장점을 갖는다. 따라서 임의의 레이어에서 샘플링을 할 때 다른 레이어의 활성화 함수를 이용할 수 있다.
2) 학습
RBM에서는 자체 알고리즘이 아닌 PCD(Parmanent Contrastive Divergence) 알고리즘이 적용된 프로시져를 통해 학습이 이뤄지며, 에너지 함수의 그래디언트 추정을 하기 때문에 최대 유사 가능도의 근사치를 결과로 얻을 수 있다. PCD 알고리즘은 크게 양성단계, 음성단계로 나눠진다.
- 양성 단계
학습 데이터 셋 X의 확률을 증가시켜 결과적으로 모델의 에너지를 감소시킨다. - 음성 단계
모델에서 샘플링 기법(깁스 샘플링)을 이용하고 이를 통해 음성 단계 그래디언트를 추정한다.
음성 단계를 거치면 모델을 통해 생성된 샘플의 확률을 감소하는 효과가 나타난다. 구체적인 과정은 아래와 같다.
① 현재 반복 단계에서 활성화된 히든 레이어의 가중치 값을 계산함
② PCD의 양성 단계 수행 : 입력 값으로 이전 반복 수행단계의 깁스 체인 상태를 이용함
③ PCD의 음성 단계 수행 : 기존의 깁스 체인 상태를 이용해 남은 에너지 값을 산출함
④ 계산된 에너지 값을 사용해 히든 레이어의 활성화된 가중치를 업데이트 함
RBM의 반복 수행이 계속될수록 남은 에너지 값이 점점 작아지게 되며, 학습 데이터셋 확률은 1, 남은 에너지는 0이 될 때 까지 학습을 반복한다.
2. RBM 애플리케이션
MNIST 숫자 필기제 인식 데이터를 이용해 데이터 셋을 분류하는 RBM 클래스를 제작해보자.
[Python Code-utils.py]

import numpy

def scale_to_unit_interval(ndar, eps=1e-8):
    ndar = ndar.copy()
    ndar -= ndar.min()
    ndar *= 1.0 / (ndar.max() + eps)
    return ndar

def tile_raster_images(X, img_shape, tile_shape, tile_spacing=(0, 0), scale_rows_to_unit_interval=True, output_pixel_vals=True):

    assert len(img_shape) == 2
    assert len(tile_shape) == 2
    assert len(tile_spacing) == 2

    out_shape = [
        (ishp + tsp) * tshp - tsp
        for ishp, tshp, tsp in zip(img_shape, tile_shape, tile_spacing)
    ]

    if isinstance(X, tuple):
        assert len(X) == 4
        # Create an output numpy ndarray to store the image
        if output_pixel_vals:
            out_array = numpy.zeros((out_shape[0], out_shape[1], 4),
                                    dtype='uint8')
        else:
            out_array = numpy.zeros((out_shape[0], out_shape[1], 4),
                                    dtype=X.dtype)

        #colors default to 0, alpha defaults to 1 (opaque)
        if output_pixel_vals:
            channel_defaults = [0, 0, 0, 255]
        else:
            channel_defaults = [0., 0., 0., 1.]

        for i in range(4):
            if X[i] is None:
                dt = out_array.dtype
                if output_pixel_vals:
                    dt = 'uint8'
                out_array[:, :, i] = numpy.zeros(
                    out_shape,
                    dtype=dt
                ) + channel_defaults[i]
            else:
                out_array[:, :, i] = tile_raster_images(
                    X[i], img_shape, tile_shape, tile_spacing,
                    scale_rows_to_unit_interval, output_pixel_vals)
        return out_array

    else:
        H, W = img_shape
        Hs, Ws = tile_spacing

        dt = X.dtype
        if output_pixel_vals:
            dt = 'uint8'
        out_array = numpy.zeros(out_shape, dtype=dt)

        for tile_row in range(tile_shape[0]):
            for tile_col in range(tile_shape[1]):
                if tile_row * tile_shape[1] + tile_col < X.shape[0]:
                    this_x = X[tile_row * tile_shape[1] + tile_col]
                    if scale_rows_to_unit_interval:
                        this_img = scale_to_unit_interval(
                            this_x.reshape(img_shape))
                    else:
                        this_img = this_x.reshape(img_shape)
                    c = 1
                    if output_pixel_vals:
                        c = 255
                    out_array[
                        tile_row * (H + Hs): tile_row * (H + Hs) + H,
                        tile_col * (W + Ws): tile_col * (W + Ws) + W
                    ] = this_img * c
        return out_array
[Python Code-logistic_sgd.py -1]

import pickle
import gzip
import os
import sys
import timeit

import numpy

import theano
import theano.tensor as T


class LogisticRegression(object):
    def __init__(self, input, n_in, n_out):
        self.W = theano.shared(
            value=numpy.zeros(
                (n_in, n_out),
            dtype=theano.config.floatX
            ),
            name='W',
            borrow=True
        )

        self.b = theano.shared(
            value=numpy.zeros(
                (n_out,),
                dtype=theano.config.floatX
            ),
            name='b',
            borrow=True
        )

        self.p_y_given_x = T.nnet.softmax(T.dot(input, self.W) + self.b)
        self.y_pred = T.argmax(self.p_y_given_x, axis=1)
        self.params = [self.W, self.b]

        self.input = input

    def negative_log_likelihood(self, y):
        return -T.mean(T.log(self.p_y_given_x)[T.arange(y.shape[0]), y])

    def errors(self, y):
        if y.ndim != self.y_pred.ndim:
            raise TypeError(
                'y should have the same shape as self.y_pred',
                ('y', y.type, 'y_pred', self.y_pred.type)
            )
        if y.dtype.startswith('int'):
            # the T.neq operator returns a vector of 0s and 1s, where 1
            # represents a mistake in prediction
            return T.mean(T.neq(self.y_pred, y))
        else:
            raise NotImplementedError()

def load_data(dataset):
    data_dir, data_file = os.path.split(dataset)

    if data_dir == "" and not os.path.isfile(dataset):
        new_path = os.path.join(os.path.split(__file__)[0], "..", "data", dataset)

    if os.path.isfile(new_path) or data_file == 'mnist.pkl.gz':
        dataset = new_path

    if (not os.path.isfile(dataset)) and data_file == 'mnist.pkl.gz':
        import urllib.request, urllib.parse, urllib.error
        origin = (
            'http://www.iro.umontreal.ca/~lisa/deep/data/mnist/mnist.pkl.gz'
        )
        print('Downloading data from %s' % origin)
        urllib.request.urlretrieve(origin, dataset)

    print('... loading data')

    f = gzip.open(dataset, 'rb')
    train_set, valid_set, test_set = pickle.load(f,encoding='latin1')
    f.close()

    def shared_dataset(data_xy, borrow=True):
        data_x, data_y = data_xy
        shared_x = theano.shared(numpy.asarray(data_x, dtype=theano.config.floatX), borrow=borrow)
        shared_y = theano.shared(numpy.asarray(data_y, dtype=theano.config.floatX), borrow=borrow)
        return shared_x, T.cast(shared_y, 'int32')

    test_set_x, test_set_y = shared_dataset(test_set)
    valid_set_x, valid_set_y = shared_dataset(valid_set)
    train_set_x, train_set_y = shared_dataset(train_set)

    rval = [(train_set_x, train_set_y), (valid_set_x, valid_set_y),
            (test_set_x, test_set_y)]
    return rval

def sgd_optimization_mnist(learning_rate=0.13, n_epochs=1000, dataset='mnist.pkl.gz', batch_size=600):
    datasets = load_data(dataset)

    train_set_x, train_set_y = datasets[0]
    valid_set_x, valid_set_y = datasets[1]
    test_set_x, test_set_y = datasets[2]

    n_train_batches = train_set_x.get_value(borrow=True).shape[0] / batch_size
    n_valid_batches = valid_set_x.get_value(borrow=True).shape[0] / batch_size
    n_test_batches = test_set_x.get_value(borrow=True).shape[0] / batch_size
    print('... building the model')

    index = T.lscalar()

    x = T.matrix('x')
    y = T.ivector('y')

    classifier = LogisticRegression(input=x, n_in=28 * 28, n_out=10)
    cost = classifier.negative_log_likelihood(y)

    test_model = theano.function(inputs=[index], outputs=classifier.errors(y),
        givens={
            x: test_set_x[index * batch_size: (index + 1) * batch_size],
            y: test_set_y[index * batch_size: (index + 1) * batch_size]
        }
    )

    validate_model = theano.function(inputs=[index], outputs=classifier.errors(y),
        givens={
            x: valid_set_x[index * batch_size: (index + 1) * batch_size],
            y: valid_set_y[index * batch_size: (index + 1) * batch_size]
        }
    )
    g_W = T.grad(cost=cost, wrt=classifier.W)
    g_b = T.grad(cost=cost, wrt=classifier.b)

    print('... training the model')
    patience = 5000  # look as this many examples regardless
    patience_increase = 2
    improvement_threshold = 0.995
    validation_frequency = min(n_train_batches, patience / 2)
    best_validation_loss = numpy.inf
    test_score = 0.
    start_time = timeit.default_timer()

    done_looping = False
    epoch = 0
[Python Code-logistic_sgd.py -2]

while (epoch < n_epochs) and (not done_looping):
    epoch = epoch + 1

    for minibatch_index in range(int(n_train_batches)):

            minibatch_avg_cost = train_model(minibatch_index)
            # iteration number
            iter = (epoch - 1) * n_train_batches + minibatch_index

            if (iter + 1) % validation_frequency == 0:
                # compute zero-one loss on validation set
                validation_losses = [validate_model(i)
                                     for i in range(n_valid_batches)]
                this_validation_loss = numpy.mean(validation_losses)

                print((
                    'epoch %i, minibatch %i/%i, validation error %f %%' %
                    (
                        epoch,
                        minibatch_index + 1,
                        n_train_batches,
                        this_validation_loss * 100.
                    )
                ))

                # if we got the best validation score until now
                if this_validation_loss < best_validation_loss:
                    #improve patience if loss improvement is good enough
                    if this_validation_loss < best_validation_loss *  \
                       improvement_threshold:
                        patience = max(patience, iter * patience_increase)

                    best_validation_loss = this_validation_loss
                    # test it on the test set

                    test_losses = [test_model(i)
                                   for i in range(n_test_batches)]
                    test_score = numpy.mean(test_losses)

                    print((
                        (
                            '     epoch %i, minibatch %i/%i, test error of'
                            ' best model %f %%'
                        ) %
                        (
                            epoch,
                            minibatch_index + 1,
                            n_train_batches,
                            test_score * 100.
                        )
                    ))

                    # save the best model
                    with open('best_model.pkl', 'w') as f:
                        pickle.dump(classifier, f)

            if patience <= iter:
                done_looping = True
                break

    end_time = timeit.default_timer()
    print((
        (
            'Optimization complete with best validation score of %f %%,'
            'with test performance %f %%'
        )
        % (best_validation_loss * 100., test_score * 100.)
    ))
    print('The code run for %d epochs, with %f epochs/sec' % (
        epoch, 1. * epoch / (end_time - start_time)))
    print(('The code for file ' +
                          os.path.split(__file__)[1] +
                          ' ran for %.1fs' % ((end_time - start_time))), file=sys.stderr)

def predict():
    classifier = pickle.load(open('best_model.pkl'))

    predict_model = theano.function(
        inputs=[classifier.input],
        outputs=classifier.y_pred)\

    dataset='mnist.pkl.gz'
    datasets = load_data(dataset)
    test_set_x, test_set_y = datasets[2]
    test_set_x = test_set_x.get_value()

    predicted_values = predict_model(test_set_x[:10])
    print ("Predicted values for the first 10 examples in test set:")
    print(predicted_values)


if __name__ == '__main__':
    sgd_optimization_mnist()
[Python Code-rbm.py-1]

import timeit

try:
    import PIL.Image as Image
except ImportError:
    import Image

import numpy

import theano
import theano.tensor as T
import os

from theano.tensor.shared_randomstreams import RandomStreams

from utils import tile_raster_images
from logistic_sgd import load_data

# start-snippet-1
class RBM(object):
    def __init__(self, input=None, n_visible=784, n_hidden=500, W=None, hbias=None, vbias=None, numpy_rng=None, theano_rng=None):
        self.n_visible = n_visible
        self.n_hidden = n_hidden

        if numpy_rng is None:
            numpy_rng = numpy.random.RandomState(1234)

        if theano_rng is None:
            theano_rng = RandomStreams(numpy_rng.randint(2 ** 30))

        if W is None:
            initial_W = numpy.asarray(
                numpy_rng.uniform(
                    low=-4 * numpy.sqrt(6. / (n_hidden + n_visible)),
                    high=4 * numpy.sqrt(6. / (n_hidden + n_visible)),
                    size=(n_visible, n_hidden)
                ),
                dtype=theano.config.floatX
            )
            W = theano.shared(value=initial_W, name='W', borrow=True)

        if hbias is None:
            hbias = theano.shared(
                value=numpy.zeros(
                    n_hidden,
                    dtype=theano.config.floatX
                ),
                name='hbias',
                borrow=True
            )

        if vbias is None:
            vbias = theano.shared(
                value=numpy.zeros(
                    n_visible,
                    dtype=theano.config.floatX
                ),
                name='vbias',
                borrow=True
            )

        self.input = input
        if not input:
            self.input = T.matrix('input')

        self.W = W
        self.hbias = hbias
        self.vbias = vbias
        self.theano_rng = theano_rng
        self.params = [self.W, self.hbias, self.vbias]

    def free_energy(self, v_sample):
        wx_b = T.dot(v_sample, self.W) + self.hbias
        vbias_term = T.dot(v_sample, self.vbias)
        hidden_term = T.sum(T.log(1 + T.exp(wx_b)), axis=1)
        return -hidden_term - vbias_term

    def propup(self, vis):
        pre_sigmoid_activation = T.dot(vis, self.W) + self.hbias
        return [pre_sigmoid_activation, T.nnet.sigmoid(pre_sigmoid_activation)]

    def sample_h_given_v(self, v0_sample):
        pre_sigmoid_h1, h1_mean = self.propup(v0_sample)
        h1_sample = self.theano_rng.binomial(size=h1_mean.shape, n=1, p=h1_mean, dtype=theano.config.floatX)
        return [pre_sigmoid_h1, h1_mean, h1_sample]

    def propdown(self, hid):
        pre_sigmoid_activation = T.dot(hid, self.W.T) + self.vbias
        return [pre_sigmoid_activation, T.nnet.sigmoid(pre_sigmoid_activation)]

    def sample_v_given_h(self, h0_sample):
        pre_sigmoid_v1, v1_mean = self.propdown(h0_sample)
        v1_sample = self.theano_rng.binomial(size=v1_mean.shape, n=1, p=v1_mean, dtype=theano.config.floatX)
        return [pre_sigmoid_v1, v1_mean, v1_sample]

    def gibbs_hvh(self, h0_sample):
        pre_sigmoid_v1, v1_mean, v1_sample = self.sample_v_given_h(h0_sample)
        pre_sigmoid_h1, h1_mean, h1_sample = self.sample_h_given_v(v1_sample)
        return [pre_sigmoid_v1, v1_mean, v1_sample, pre_sigmoid_h1, h1_mean, h1_sample]

    def gibbs_vhv(self, v0_sample):
        pre_sigmoid_h1, h1_mean, h1_sample = self.sample_h_given_v(v0_sample)
        pre_sigmoid_v1, v1_mean, v1_sample = self.sample_v_given_h(h1_sample)
        return [pre_sigmoid_h1, h1_mean, h1_sample, pre_sigmoid_v1, v1_mean, v1_sample]

    def get_cost_updates(self, lr=0.1, persistent=None, k=1):
        pre_sigmoid_ph, ph_mean, ph_sample = self.sample_h_given_v(self.input)
        if persistent is None:
            chain_start = ph_sample
        else:
            chain_start = persistent
        ([pre_sigmoid_nvs, nv_means, nv_samples, pre_sigmoid_nhs, nh_means, nh_samples], updates) = theano.scan(self.gibbs_hvh, outputs_info=[None, None, None, None, None, chain_start], n_steps=k)
        chain_end = nv_samples[-1]
        cost = T.mean(self.free_energy(self.input)) - T.mean(self.free_energy(chain_end))
        gparams = T.grad(cost, self.params, consider_constant=[chain_end])

        for gparam, param in zip(gparams, self.params):
            updates[param] = param - gparam * T.cast(lr, dtype=theano.config.floatX)

        if persistent:
            updates[persistent] = nh_samples[-1]
            monitoring_cost = self.get_pseudo_likelihood_cost(updates)
        else:
            monitoring_cost = self.get_reconstruction_cost(updates, pre_sigmoid_nvs[-1])
        return monitoring_cost, updates
[Python Code-rbm.py-2]

def get_pseudo_likelihood_cost(self, updates):
    bit_i_idx = theano.shared(value=0, name='bit_i_idx')
    xi = T.round(self.input)
    fe_xi = self.free_energy(xi)

    xi_flip = T.set_subtensor(xi[:, bit_i_idx], 1 - xi[:, bit_i_idx])

    fe_xi_flip = self.free_energy(xi_flip)
    cost = T.mean(self.n_visible * T.log(T.nnet.sigmoid(fe_xi_flip - fe_xi)))
    updates[bit_i_idx] = (bit_i_idx + 1) % self.n_visible

    return cost

def get_reconstruction_cost(self, updates, pre_sigmoid_nv):
    cross_entropy = T.mean(
        T.sum(
            self.input * T.log(T.nnet.sigmoid(pre_sigmoid_nv)) +
            (1 - self.input) * T.log(1 - T.nnet.sigmoid(pre_sigmoid_nv)),
            axis=1
        )
    )

    return cross_entropy


def test_rbm(learning_rate=0.1, training_epochs=15, dataset='mnist.pkl.gz',
    batch_size=20, n_chains=20, n_samples=10, output_folder='rbm_plots', n_hidden=500):

    datasets = load_data(dataset)

    train_set_x, train_set_y = datasets[0]
    test_set_x, test_set_y = datasets[2]

    n_train_batches = train_set_x.get_value(borrow=True).shape[0] / batch_size

    index = T.lscalar()    # index to a [mini]batch
    x = T.matrix('x')  # the data is presented as rasterized images

    rng = numpy.random.RandomState(123)
    theano_rng = RandomStreams(rng.randint(2 ** 30))
    persistent_chain = theano.shared(numpy.zeros((batch_size, n_hidden),
                                                 dtype=theano.config.floatX),
                                     borrow=True)

    rbm = RBM(input=x, n_visible=28 * 28,
              n_hidden=n_hidden, numpy_rng=rng, theano_rng=theano_rng)

    cost, updates = rbm.get_cost_updates(lr=learning_rate,
                                         persistent=persistent_chain, k=15)

    if not os.path.isdir(output_folder):
        os.makedirs(output_folder)
    os.chdir(output_folder)

    train_rbm = theano.function(
        [index],
        cost,
        updates=updates,
        givens={
            x: train_set_x[index * batch_size: (index + 1) * batch_size]
        },
        name='train_rbm'
    )

    plotting_time = 0.
    start_time = timeit.default_timer()

    for epoch in range(training_epochs):
        mean_cost = []
        for batch_index in range(int(n_train_batches)):
            mean_cost += [train_rbm(batch_index)]

        print('Training epoch %d, cost is ' % epoch, numpy.mean(mean_cost))

        plotting_start = timeit.default_timer()

        image = Image.fromarray(
            tile_raster_images(
                X=rbm.W.get_value(borrow=True).T,
                img_shape=(28, 28),
                tile_shape=(10, 10),
                tile_spacing=(1, 1)
            )
        )
        image.save('filters_at_epoch_%i.png' % epoch)
        plotting_stop = timeit.default_timer()
        plotting_time += (plotting_stop - plotting_start)

    end_time = timeit.default_timer()

    pretraining_time = (end_time - start_time) - plotting_time

    print ('Training took %f minutes' % (pretraining_time / 60.))

    number_of_test_samples = test_set_x.get_value(borrow=True).shape[0]
    test_idx = rng.randint(number_of_test_samples - n_chains)
    persistent_vis_chain = theano.shared(
        numpy.asarray(
            test_set_x.get_value(borrow=True)[test_idx:test_idx + n_chains],
            dtype=theano.config.floatX
        )
    )
    plot_every = 1000
    (
        [
            presig_hids,
            hid_mfs,
            hid_samples,
            presig_vis,
            vis_mfs,
            vis_samples
        ],
        updates
    ) = theano.scan(
        rbm.gibbs_vhv,
        outputs_info=[None, None, None, None, None, persistent_vis_chain],
        n_steps=plot_every
    )

    updates.update({persistent_vis_chain: vis_samples[-1]})
    sample_fn = theano.function(
        [],
        [
            vis_mfs[-1],
            vis_samples[-1]
        ],
        updates=updates,
        name='sample_fn'
    )
    image_data = numpy.zeros(
        (29 * n_samples + 1, 29 * n_chains - 1),
        dtype='uint8'
    )
    for idx in range(n_samples):
        vis_mf, vis_sample = sample_fn()
        print(' ... plotting sample ', idx)
        image_data[29 * idx:29 * idx + 28, :] = tile_raster_images(
            X=vis_mf,
            img_shape=(28, 28),
            tile_shape=(1, n_chains),
            tile_spacing=(1, 1)
        )

    image = Image.fromarray(image_data)
    image.save('samples.png')
    os.chdir('../')

if __name__ == '__main__':
    test_rbm()
[실행결과]
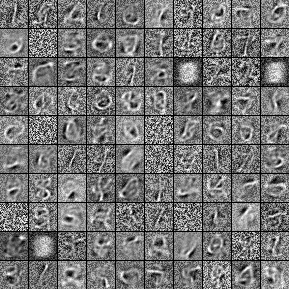
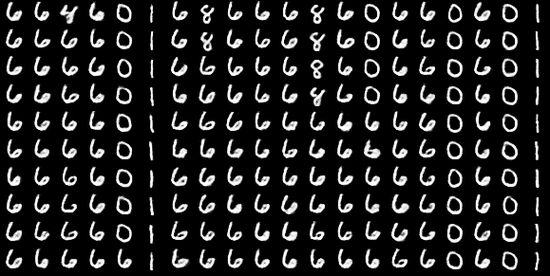
위의 실행결과와 같은 그림이 총 15개가 나오며 아래쪽 시각화는 sample 데이터를 추출한 것이다.
(실행환경: Windows / 사용 IDE : Pycharm, Anaconda 3.x)
위의 코드를 좀 더 살펴보자. 코드에는 다음과 같은 사항들을 포함하고 있다.
- RBM 파라미터를 초기화한다.
- RBM 파라미터는 레이어 규모, 바이어스 벡터, 가중치 매트릭스 등이 있다.
- 히든 레이어와 가시성 레이어 간의 통신과 추론 분석을 위한 함수를 정의한다.
- 네트워크 노드의 파라미터에 대해 업데이트 할 수 있는 함수를 정의한다.
- 학습 프로세스를 위해 효율적인 샘플링을 할 수 있는 함수를 정의한다.
- 모델이 남은 에너지를 계산하는 함수를 정의한다.
- 의사-유사 가능도를 정의한다. 이는 적절한 하이퍼파라미터를 선택하는 데 참고할 수 있게 로그 유사 가능도 프록시로 쓰일 수 있다.
이번에는 RBM 클래스의 내용을 확인하자. 가장 먼저 RBM 생성자를 만들어준다. 가시성 노드의 개수(n_visible) 과 히든 노드의 개수(n_hidden) 및 RBM 추론 함수와 CD 업데이트를 실행시키는 방법을 조정하는 데 필요한 여러 파라미터 등이 있다. w 는 가중치 매트릭스에 대한 포인터로 사용될 수 있다. hbias, vbias 는 공유되는 히든 유닛 바이어스 벡터와 사기성 유닛 바이어스 벡터에서 참조하는 데 사용된다. input 은 RBM이 다른 그래프 요소들과 연결될 수 있도록 해주며 RBM 체인을 생성할 수 있다.
[Python Code]

class RBM(object):
    def __init__(self, input=None, n_visible=784, n_hidden=500, W=None, hbias=None,
        vbias=None, numpy_rng=None, theano_rng=None):
생성자를 만든 후 각 파라미터에 대한 값을 설정해준다. 코드 내에 theano_rng 는 RBM 히든 유닛에서 샘플 데이터를 추출하는 데 사용된다. 아래의 코드에서는 W에 대해 데이터 타입을 변경하며 이를 통해 GPU에서 실행이 가능해진다.
[Python Code]

self.n_visible = n_visible
self.n_hidden = n_hidden

if numpy_rng is None:
    numpy_rng = numpy.random.RandomState(1234)

if theano_rng is None:
    theano_rng = RandomStreams(numpy_rng.randint(2 ** 30))

if W is None:
    initial_W = numpy.asarray(
        numpy_rng.uniform(
            low=-4 * numpy.sqrt(6. / (n_hidden + n_visible)),
            high=4 * numpy.sqrt(6. / (n_hidden + n_visible)),
            size=(n_visible, n_hidden)
        ),
        dtype=theano.config.floatX
    )

W = theano.shared(value=initial_W, name='W', borrow=True)

if hbias is None:
    hbias = theano.shared(
        value=numpy.zeros(
            n_hidden,
            dtype=theano.config.floatX
        ),
        name='hbias',
        borrow=True
    )

if vbias is None:
    vbias = theano.shared(
        value=numpy.zeros(
            n_visible,
            dtype=theano.config.floatX
        ),
        name='vbias',
        borrow=True
    )
마지막으로 입력에 대한 초기화를 진행한다.
[Python Code]

self.input = input

if not input:
    self.input = T.matrix('input')

self.W = W
self.hbias = hbias
self.vbias = vbias
self.theano_rng = theano_rng
self.params = [self.W, self.hbias, self.vbias]
두번째로 심볼릭 그래프를 생성하자. 이를 위해 레이어 간의 전파와 네트워크의 활성화 계산 작업을 관리하는 함수를 생성한다. 아래 2개 함수는 임의의 레이어에 있는 유닛의 활성화를 다른 레이어로 전달하는 역할을 한다. 자세한 내용은 다음과 같다.
- 첫 번째 함수는 가시성 유닛의 샘플 값 조건하에서 활성화를 계산할 수 있다.
- 두 번째 함수는 히든 레이어의 활성화를 가시성 유닛으로 전파한다.
위의 두 함수를 코드로 표현한 것이 아래의 코드이다.
[Python Code]

def propup(self, vis):
    pre_sigmoid_activation = T.dot(vis, self.W) + self.hbias

    return [pre_sigmoid_activation, T.nnet.sigmoid(pre_sigmoid_activation)]

def propdown(self, hid):
    pre_sigmoid_activation = T.dot(hid, self.W.T) + self.vbias

    return [pre_sigmoid_activation, T.nnet.sigmoid(pre_sigmoid_activation)]
위의 두 함수를 생성한 이유는 PCD의 히든 유닛에서 샘플링 작업을 수행해야되기 때문이다. propup 함수의 경우, 진척 상황을 확인하기 위해 RBM 에서 샘플을 추출하려고 할 때, 가시성 레이어에서 샘플링 작업을 하는 것이 유용하기 때문이다. 위에 대한 내용은 실행 결과에 제시된 필기체 샘플 중에 첫 2개열을 확인해보면 0이 6으로 또는 8에서 6으로 변경되는 것을 확인할 수 있다.
가시성 레이어의 활성화에 대해 학습한 내용을 토대로 히든 노드의 활성화가 되면 유닛 활성화 샘플의 전달이 가능해진다. 이를 아래의 코드를 통해서 구현 방법을 살펴보자.
[Python Code]

def sample_h_given_v(self, v0_sample):
    pre_sigmoid_h1, h1_mean = self.propup(v0_sample)
    h1_sample = self.theano_rng.binomial(size=h1_mean.shape, n=1, p=h1_mean, dtype=theano.config.floatX)

    return [pre_sigmoid_h1, h1_mean, h1_sample]

def sample_v_given_h(self, h0_sample):
    pre_sigmoid_v1, v1_mean = self.propdown(h0_sample)
    v1_sample = self.theano_rng.binomial(size=v1_mean.shape, n=1, p=v1_mean, dtype=theano.config.floatX)

    return [pre_sigmoid_v1, v1_mean, v1_sample]
다음으로 깁스 샘플링 단계를 수행하기 위해 필요한 연결과 업데이트를 반복 수행할 수 있다.
[Python Code]

def gibbs_hvh(self, h0_sample):
    pre_sigmoid_v1, v1_mean, v1_sample = self.sample_v_given_h(h0_sample)
    pre_sigmoid_h1, h1_mean, h1_sample = self.sample_h_given_v(v1_sample)

    return [pre_sigmoid_v1, v1_mean, v1_sample, pre_sigmoid_h1, h1_mean, h1_sample]

def gibbs_vhv(self, v0_sample):
    pre_sigmoid_h1, h1_mean, h1_sample = self.sample_h_given_v(v0_sample)
    pre_sigmoid_v1, v1_mean, v1_sample = self.sample_v_given_h(h1_sample)

    return [pre_sigmoid_h1, h1_mean, h1_sample, pre_sigmoid_v1, v1_mean, v1_sample]
지금까지 작성한 코드는 모델링, 즉, 노드, 레이어, 레이어간의 연결을 설정했다. 다음으로 히든 레이어에서 깁스 샘플링을 이용해 네트워크를 업데이트하기 전에 아래의 내용을 확인하자. 네트워크를 업데이트 하기 위해서는 다음의 2가지 과정이 필요하다.
① 모델의 에너지 계산하기
깁스 샘플링 코드를 이용해 PCD를 구현한다. 이 후 깁스 수행단계를 확인하는 파라미터를 k=1로 설정한다.
그래디언트 하강 계산을 위해 필요하며, 네트워크 업데이트 코드에 PCD 결과를 전달하는 방법을 생성한다.
② 학습과정 전반에 걸쳐 RBM이 진척을 보이고 성공적으로 수행을 완료하도록 추적 방안 개발하기
먼저 모델의 잔여 에너지량을 계산한다. 에너지량은 히든 레이어의 확률 분포에 대한 로그의 역수를 결과로 반환한다.
[Python Code]

def free_energy(self, v_sample):
    ''' Function to compute the free energy '''
    wx_b = T.dot(v_sample, self.W) + self.hbias
    vbias_term = T.dot(v_sample, self.vbias)
    hidden_term = T.sum(T.log(1 + T.exp(wx_b)), axis=1)

    return -hidden_term - vbias_term
다음으로 PCD를 생성한다. 이 때 학습률을 줄여서 표현한 lr은 학습이 얼마나 빠른 속도로 진행될지를 조정하는 역할을 한다. k 는 PCD의 수행횟수를 설정한다. 추가적으로 PCD에 양성단계, 음성단계가 포함되어 있다는 것을 감안하여 구현한다.
[Python Code]

def get_cost_updates(self, lr=0.1, persistent=None, k=1):

    # 양성 단계
    pre_sigmoid_ph, ph_mean, ph_sample = self.sample_h_given_v(self.input)

    if persistent is None:
        chain_start = ph_sample
    else:
        chain_start = persistent

    # 음성 단계
    (
        [
            pre_sigmoid_nvs,
            nv_means,
            nv_samples,
            pre_sigmoid_nhs,
            nh_means,
            nh_samples
        ],
        updates
    ) = theano.scan(
        self.gibbs_hvh,
        outputs_info=[None, None, None, None, None, chain_start],
        n_steps=k
    )
    chain_end = nv_samples[-1]

    cost = T.mean(self.free_energy(self.input)) - T.mean(
        self.free_energy(chain_end))
    gparams = T.grad(cost, self.params, consider_constant=[chain_end])
마지막으로 네트워크 출력 결과를 전달하는 방법을 작성한다. 앞서 네트워크 업데이트 코드에 PCD 학습 프로세스를 연동할 수 있으며, gibbs_hvh의 theano.scan에 딕셔너리 포인트를 업데이트한다. gibbs_hvh는 현재의 theano_rng의 임의의 상태에 대한 룰을 포함하고 있기 때문에, 딕셔너리에 깁스 체인의 상태를 포함하고 있는 변수와 새 파라미터 값을 추가한다.
[Python Code]

for gparam, param in zip(gparams, self.params):
    updates[param] = param - gparam * T.cast(lr, dtype=theano.config.floatX)

if persistent:
    updates[persistent] = nh_samples[-1]
    monitoring_cost = self.get_pseudo_likelihood_cost(updates)
else:
    monitoring_cost = self.get_reconstruction_cost(updates, pre_sigmoid_nvs[-1])

return monitoring_cost, updates
*** rbm.py 를 실행하기 전에 아래의 내용을 먼저 실행해주시는게 좋습니다.
CMD > conda install libpython
CMD > conda install m2w64-toolchain
[실행결과]

D:\Program\Anaconda3\python.exe D:/workspace/Python3/rbm.py
... loading data

Training epoch 0, cost is -89.96398555364773
Training epoch 1, cost is -80.0657401103092
Training epoch 2, cost is -73.5262562765747
Training epoch 3, cost is -72.33225379639093
Training epoch 4, cost is -68.18896515797107
Training epoch 5, cost is -62.9620913565992
Training epoch 6, cost is -65.53097587464154
Training epoch 7, cost is -67.65979236488346
Training epoch 8, cost is -68.25218159883819
Training epoch 9, cost is -64.63348765402002
Training epoch 10, cost is -60.74452570055446
Training epoch 11, cost is -60.947685647515044
Training epoch 12, cost is -63.18494238131548
Training epoch 13, cost is -63.23591249763959
Training epoch 14, cost is -62.168222768118696

Training took 31.499180 minutes

... plotting sample 0
... plotting sample 1
... plotting sample 2
... plotting sample 3
... plotting sample 4
... plotting sample 5
... plotting sample 6
... plotting sample 7
... plotting sample 8
... plotting sample 9
3. 심층신뢰망(DBN, Deep Belief Network)
그래프기반 모델로, 다중 스택 RBM을 이용해 구축되고, 입력층으로 은닉층으로 구성된 RBM을 블록처럼 여러 층 쌓은 형태로 연결된 신경망 형태이다.
RBM이 학습용 데이터의 픽셀에서 얻은 피처의 레이어를 학습시키는 동안 뒤에 이어지는 레이어는 활성화를 처리한다. 이 때, 얼마나 많은 RBM이 필요한지는 해당 문제의 성격에 달려있다. 정확도와 계산 비용간의 트레이드 오프(Trade-off)가 발생하기 때문이다.
RBM의 각 레이어는 학습 데이터의 로그 확률에 대한 하한선을 향상시키며, 이는 피처 레이어가 추가될 수록 필연적으로 점점 더 나아진다는 것이다. 레이어의 규모에 대해서는, RBM의 히든레이어에 있는 노드 수를 줄일 수록 좋은데, 그 이유는 네트워크의 식별함수를 목적 없이 비효율적으로 학습하는 문제가 야기될 수 있기 때문이다.
최종 레이어는 데이터의 분산 값 차원과 비슷한 크기가 될 때까지 단계적으로 레이어의 규모를 줄여 나가는 것이 좋다. 일례로, 지나치게 많은 수의 노드로 구성된 DBN의 끝부분에 멀티 레이어 퍼셉트론을 붙이는 경우, 마치 큰 파이프의 마지막에 빨때를 붙여놓은 것과 같으므로 데이터의 관점에서 병목 현상이 발생할 수 있기 때문이다.
1) DBN의 학습
일반적으로 탐욕(Greedy) 방식으로 이뤄진다. 전체를 대상으로 하기보다 각 레이어상에서 최적이 되도록 학습한다. 과정은 아래와 같다.
① 첫번째 레이어의 학습 과정은 RBM 학습 기법을 이용하여 수행한다. 첫 레이어는 히든 유닛에 대해 데이터 분포를 깁스 샘플링한 사후 분포로 변환한다. 입력 데이터 자체 보다 RBM을 학습시키는 데 훨씬 더 도움되며, 다음 RBM 레이어는 앞선 분포를 이용해 학습이 이뤄진다.
② 다음 레이어에서는 앞 단계 레이어에서 생성된 결과로부터 샘플을 추출해 학습을 진행한다.모든 파라미터는 성능 측정치를 이용해 계속 조정된다.
2) DBN 애플리케이션
DBN을 구축하여 앞서 살펴본 MNIST 손글씨 분류 데이터를 학습시켜보자. 전체적인 코드는 첨부파일에 DBN.py 를 참고하기 바란다.
[Python Code]

class DBN(object):

    def __init__(self, numpy_rng, theano_rng=None, n_ins=784,
                 hidden_layers_sizes=[500, 500], n_outs=10):

        self.sigmoid_layers = []
        self.rbm_layers = []
        self.params = []
        self.n_layers = len(hidden_layers_sizes)

        assert self.n_layers > 0

        if not theano_rng:
            theano_rng = MRG_RandomStreams(numpy_rng.randint(2 ** 30))

        self.x = T.matrix('x')
        self.y = T.ivector('y')
위에서 정의한 파라미터들에 대한 설명은 다음과 같다.
① numpy_rng, theano_rng
RBM 히든 유닛에서 샘플 데이터를 추출하는 데 사용된다.
② n_ins
DBN 입력 피쳐개수(차원)을 의미한다.
③ hidden_layers_sizes
히든레이어의 크기를 나열한 리스트로, 각 값은 RBM 레이어를 생성할 때 필요한 크기를 의미한다.
④ n_layers
전체 네트워크에서 레이어의 개수를 의미하며, hidden_layers_sizes 를 통해 얻을 수 있다.
⑤ self.sigmoid.layers
MLP 컴포넌트를 저장하는 데 사용된다.
⑥ self.rbm_layers
MLP를 사전 학습시키는 데 사용되는 RBM레이어를 저장하는 역할을 한다.
일련의 과정은 다음과 같다.
① n_layers 크기의 시그모이드 레이어를 생성한다.
② MLP 형태로 만들어지게 시그모이드 레이어들을 연결한다.
③ 각 시그모이드 레이어에 대해 RBM을 만들며, 이를 위해 공유 가중치 행렬과 히든 바이어스 값을 이용한다.
다음으로는 시그모이드 활성화를 이용해 n_layers 만큼의 레이어를 생성한다. 아래의 코드를 이용해 입력레이어를 생성한 후 hidden_layers_sizes 만큼 히든 레이어를 생성한다.
[Python Code]

for i in range(self.n_layers):
    if i == 0:
        input_size = n_ins
    else:
        input_size = hidden_layers_sizes[i - 1]

    if i == 0:
        layer_input = self.x
    else:
        layer_input = self.sigmoid_layers[-1].output

    sigmoid_layer = HiddenLayer(rng=numpy_rng,
                                input=layer_input,
                                n_in=input_size,
                                n_out=hidden_layers_sizes[i],
                                activation=T.nnet.sigmoid)

    self.sigmoid_layers.append(sigmoid_layer)
    self.params.extend(sigmoid_layer.params)
이 후 시그모이드 레이어를 이용해 가중치를 공유할 수 있도록 RBM을 생성한다.
[Python Code]

rbm_layer = RBM(numpy_rng=numpy_rng, theano_rng=theano_rng, input=layer_input, n_visible=input_size,
                    n_hidden=hidden_layers_sizes[i], W=sigmoid_layer.W, hbias=sigmoid_layer.b
            )
self.rbm_layers.append(rbm_layer)
끝으로, MLP 처럼 DBN의 끝부분에 로지스틱 회귀 레이어를 추가한다.
[Python Code]

self.logLayer = LogisticRegression(input=self.sigmoid_layers[-1].output, n_in=hidden_layers_sizes[-1], n_out=n_outs)
self.params.extend(self.logLayer.params)
self.finetune_cost = self.logLayer.negative_log_likelihood(self.y)
self.errors = self.logLayer.errors(self.y)
두번째로, 앞서 구축한 DBN을 이용해 MNIST 손글씨 데이터를 학습하는 코드를 만들어보자. 아래의 코드는 28x28 크기의 입력데이터를 3개의 히든 레이어와 10개의 출력값을 이용해 네트워크를 구축하는 과정이다.
[Python Code]

numpy_rng = numpy.random.RandomState(123)
print('... building the model')

# construct the Deep Belief Network
dbn = DBN(numpy_rng=numpy_rng, n_ins=28 * 28, hidden_layers_sizes=[1000, 1000, 1000], n_outs=10)
사전에 언급한 데로 DBN은 크게 2단계로 학습한다. 레이어 맞춤 사전 학습은 각 레이어가 앞 단계의 레이어에서 학습된 결과를 입력으로 받아 역전파를 수행한다. 결과적으로 전체 네트워크에 걸쳐 가중치가 조정되도록 한다.
1단계인 사전 학습은 RBM의 각 레이어에서 PCD의 단계를 수행한다. 코드는 다음과 같다.
[Python Code]

print('... getting the pretraining functions')
pretraining_fns = dbn.pretraining_functions(train_set_x=train_set_x, batch_size=batch_size, k=k)

print('... pre-training the model')
start_time = timeit.default_timer()
for i in range(dbn.n_layers):
    for epoch in range(pretraining_epochs):
        c = []
        for batch_index in range(int(n_train_batches)):
            c.append(pretraining_fns[i](index=batch_index,
                                        lr=pretrain_lr))
        print('Pre-training layer %i, epoch %d, cost ' % (i, epoch), end=' ')
        print(numpy.mean(c))

end_time = timeit.default_timer()
완료가 되면 아래의 코드를 통해서 학습에 사용될 가중치들을 미세조정한다.
[Python Code]

print(('The pretraining code for file ' + os.path.split(__file__)[1] + ' ran for %.2fm' % ((end_time - start_time) / 60.)), file=sys.stderr)
2단계는 앞서 미세조정까지 완료된 가중치들을 이용해 실제 데이터를 학습한다.
[Python Code]

print('... getting the finetuning functions')
train_fn, validate_model, test_model = dbn.build_finetune_functions(datasets=datasets, batch_size=batch_size, learning_rate=finetune_lr)

print('... finetuning the model')
patience = 4 * n_train_batches
patience_increase = 2.
improvement_threshold = 0.995
validation_frequency = min(n_train_batches, patience / 2)

best_validation_loss = numpy.inf
test_score = 0.
start_time = timeit.default_timer()

done_looping = False
epoch = 0

while (epoch < training_epochs) and (not done_looping):
    epoch = epoch + 1
    for minibatch_index in range(int(n_train_batches)):

        minibatch_avg_cost = train_fn(minibatch_index)
        iter = (epoch - 1) * n_train_batches + minibatch_index

        if (iter + 1) % validation_frequency == 0:

            validation_losses = validate_model()
            this_validation_loss = numpy.mean(validation_losses)
            print((
                'epoch %i, minibatch %i/%i, validation error %f %%'
                % (
                    epoch,
                    minibatch_index + 1,
                    n_train_batches,
                    this_validation_loss * 100.
                )
            ))

            if this_validation_loss < best_validation_loss:
                if (
                    this_validation_loss < best_validation_loss *
                    improvement_threshold
                ):
                    patience = max(patience, iter * patience_increase)

                best_validation_loss = this_validation_loss
                best_iter = iter
                test_losses = test_model()
                test_score = numpy.mean(test_losses)
                print((('     epoch %i, minibatch %i/%i, test error of '
                       'best model %f %%') %
                      (epoch, minibatch_index + 1, n_train_batches,
                       test_score * 100.)))

        if patience <= iter:
            done_looping = True
            break

end_time = timeit.default_timer()
최종적으로 실행하게 되면 다음과 유사한 결과를 얻을 수 있다.
[실행 결과]

... loading data
... building the model
... getting the pretraining functions

Pre-training layer 0, epoch 0, cost -98.53649282938044
Pre-training layer 0, epoch 1, cost -83.84455761672785
Pre-training layer 0, epoch 2, cost -80.69605640025735
...
epoch 34, minibatch 5000/5000, validation error 1.460000 %
epoch 35, minibatch 5000/5000, validation error 1.450000 %
epoch 36, minibatch 5000/5000, validation error 1.450000 %
epoch 37, minibatch 5000/5000, validation error 1.460000 %
Optimization complete with best validation score of 1.440000 %, obtained at iteration 95000, with test performance 1.530000 %

The fine tuning code for file DBN.py ran for 31.87m

댓글남기기